| |
|
| Browse | Ask | Answer | Search | Join/Login |
|
|
||||
|
How can I locate my basement tub/shower drain under concrete
Just getting started on a basement remodel. I am looking at requirements to finish the bathroom rough in. My problem is I can't figure out the 2" pipe in the center of the room(basically). I read another thread on here and someone described something similar to this as a shower drain with the p-trap in the poured concrete under the pvc pipe. I am linking some pics of this pipe. Any input would be greatly appreciated. :) http://i1193.photobucket.com/albums/...entPics008.jpg
http://i1193.photobucket.com/albums/...entPics006.jpg http://i1193.photobucket.com/albums/...entPics004.jpg |
||||
|
||||
|
There should be a dapout box some where under a very thin layer of concrete. Take a two pound hammer and start tapping the floor fairly hard (not hard enough to break the concrete but hard enough to find a dense area) When you find the "soft" spot, break all the concrete out and start digging to find the drain stub. Im betting this is roughed in to for a tub/shower which means you will have to add a trap when connecting the tub waste and overflow to the drain.
|
||||

|
||||
|
If this is a shower stubout it won't have a dapout. Only bathtubs have dapouts. To check if this pipe is a shower stub up pour a quart of water down the pipe. Then take a stick and put it all the way to the bottom. If it comes back with over a inch or so of water then there's a "P" trap down there and it's a shower raiser. If it comes back with little or no moisture then you either have a lav drain or some kind of a vent. Good luck on your project. Tom
|
||||

|
||||
|
Hi Dean2dana
Look at the picture below... ;) I think you have a bathroom roughed in for a TUB. Here, I think if you chip away at the area I noted in the black box (see image) you will find the dapout these guys are talking about... should be a trap in there already set for you. The pipe coming out of the ground is the tub vent and is connected so leave it alone. The tub vent pipe will be framed around by the STUD WALL (see image) so I believe it is all set! In my opinion, it looks like the contractor knew his job so I'm betting this is roughed out to include a wall along the foundation so that when the stud wall is installed at the correct place you will measure approximately 12" to the center of that toilet drain from the face (front) of the stud wall along the foundation. Once that foundation wall is established I am betting you can measure 5 feet (average length of a tub) to that tub vent pipe!! Here, measure 12" from the center of the toilet drain back toward the foundation wall and measure the distance from that measure to the foundation wall. Now, transfer that mark across from what I am calling the tub vent and then measure to the "tub vent"... should be about 5 feet, OK (see other image below). I'm only guessing, of course, but I think this is a reasonable place to start. Check it out and let us know, OK? Mark PS, ornage in the pic. Below should be spelled ORANGE... UGH! |
||||

|
||||
|
Thanks. I will definitely try what you are showing me. I have yet to be able to break the concrete around the vent(same side you are talking about) with a 3lb sledge. Because of that I started second guessing if I was seeing the layout correctly. I see it the way you are showing me. I will let you know what I find. By the way... your info is greatly appreciated. Thanks for taking the time to really "show me" what you were talking about. For a "homeowner plumber"... pictures are always worth much more than words... at least for me.
|
||||
|
||||
|
Thanks guys! Had a few minutes and thought I could help a little.
Hard to say what happens here as dean2dana should have found a soft spot with that 3LB sledge hammer! I suppose the hole could be opposite the hole I proposed, but still wondering on the measurements. |
||||
|
||||

I just busted up the other side(partially and found the pipe at a slight angle away from "ejector pit". However, I have ran out of time this am and have to go to work(actual paid work) and take the hammer back(too small for job actually). I was going to take a couple of hours unpaid but that costs more than another rental of the "right size" tool this evening. Will keep you updated as to what I find. On a positive note... the water I poured in the pipe "actually" went to the correct pit! :) Thanks again. Well... I was wrong. Dug up opposite side and simply found the 2" pipe turning towards the main drain line in the basement. Went back and looked into the vent pipe in floor with a wispy branch and was able to make it turn in the opposite direction of the drain??? Went back to digging on the side you showed on your drawing. I was still trying to figure out how I could have missed a 2" pipe yesterday when I decided to jack hammer closer to the pipe. It was then I hit a hollow sounding rock. What I found was a large flat rock angled over the end of a very short "stub out" at the base of the vent pipe. I never imagined it would be that short and tight to the vent pipe... very little to work with. Anyway... here are the pics of what I found. I just need to add a trap to be able to connect to a tub and reattach the vent piping to the overhead... correct? 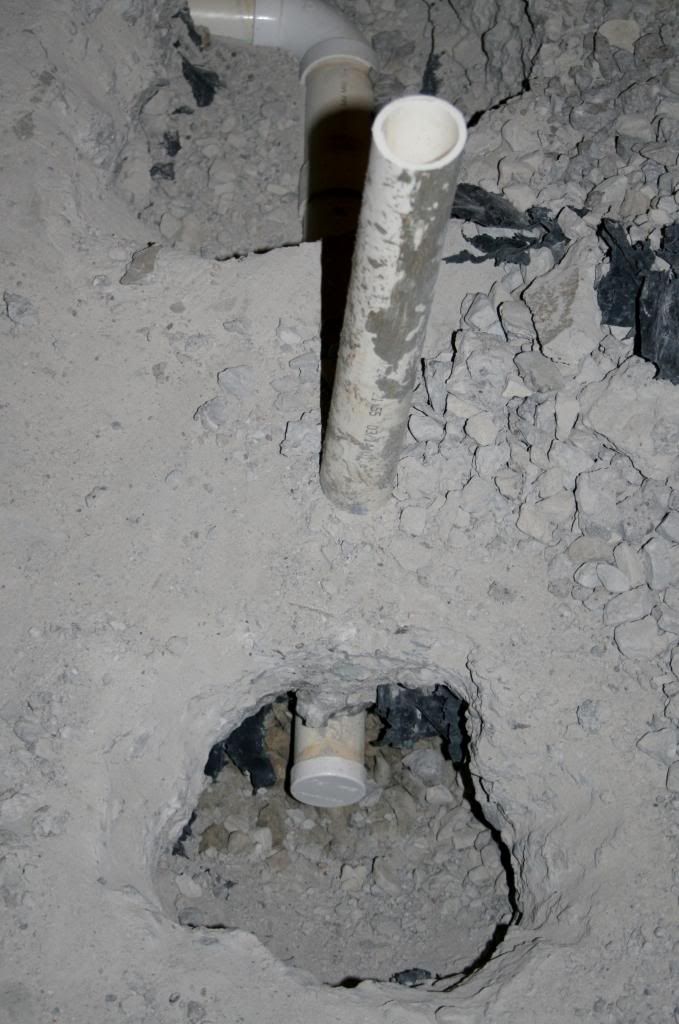 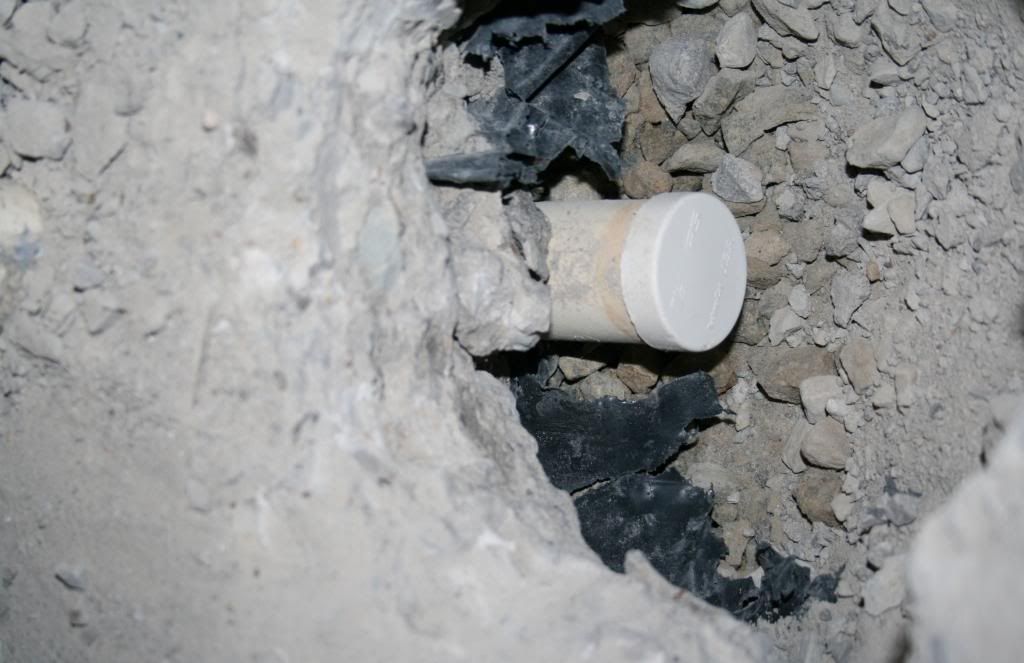 http://i1193.photobucket.com/albums/...a/IMG_0096.jpg http://i1193.photobucket.com/albums/...a/IMG_0097.jpg |
||||
|
||||
|
Real creepy of the contractor not to box that out for you... UGH!
Yeah, just add a Ptrap and reconnect the vent and you are on your way to installing the tub! I'd also advise you to open that hole up a bit larger... say 12" long by 12" wide so you can get your hands/fittings in together when making the final connection between the tub drain assembly and the Ptrap... ;) The fitting (trap adapter) off the trap wants to end up at dead center of tub and 1.5" to the center of the fitting OFF the stud wall that has the vent in it I'll try to post a drawing on it later tonight, OK? Mark |
||||
|
||||
|
See if this makes sense.. Your tub waste and overflow assembly should fit into the Ptrap and trap adapter (also called a desanco fitting) nicely with this rough in. You could also pipe the tub waste assembly up as solid PVC and in this case, the 1.5" off the stud wall stands, but you don't need the trap adapter... just pipe the PVC tub waste and overflow assembly directly into the Ptrap!
Mark |
||||
| Question Tools | Search this Question |


Add your answer here.
Check out some similar questions!
I have purchased a few 2" shower drains but the are a little to small and do not thread or they are too large and can not crew in. The one too small seem to have a dia (around threads of 2-7/8) and the one 2 big seems to have a dia of a little over 3 inches. It seems as if the correct size is 3"....
I have an unfinished basement that I am building a bathroom in. The floor in the basement is concrete, however the builder did install the PVC pipes in the cement floor so that the bathroom & plumbing is ready to be finishied. My question deals with how to install the shower draain so that it...
Hello! We have a sluggish drain in the basement that's in the concrete? Can a snake be used for this?
Eight years ago, I had a bathroom and office installed downstairs. Along the way, they dug a trench through the existing concrete slab and put in the appropriate pvc drain. This "underslab" drain runs under my office. Now I want to find out exactly where this drain is located so that I can put in...
I have completely gutted a 1950''s house basement bathroom. The shower is in the basement, the drain is embedded in the concrete basement floor. In the remodel, I intend to install ceramic tile on the floor of the shower. Ihave 3 questions. 1. Please confirm that there is no need to...
View more questions Search

|
