| |
|
| Browse | Ask | Answer | Search | Join/Login |
|
|
||||
|
Shower pipe plumbing leak
I have a leak that has progressed into a problem in my living room's ceiling tiles. My shower is directly above and the drain p-trap is visible through the tiles. A couple of tiles have become soggy and discolored, so I removed 6 - 14" ceiling tiles to see the problem. The ceiling section above those tiles is water-logged and started to show holes from the water leak. My question is how would I go about replacing the section of cast iron drain pipe that is leaking? I have heard that I need to cut out the damaged pipe and replace with PVC pipe. Any comments or help would be much appreciated. Also any pictures of repair would be great help. I would like to do this repair myself since my home warranty company went belly up on me and took my $500.
Thanks again, blake |
||||
|
||||
|
With the tiles removed can you see where the water is leaking. Does it leak only when the shower is in use and can you see up the side of the shower to where the mixing valve is mounted? We need to be 100% sure it is actually the drain pipe
|
||||

|
||||
|
OK... pretty easy job all in all.. especially if it is just a straight run of pipe. You will need the following:
I will assume you have a 2 inch cast iron pipe in place but if it is a 3 inch or even a 4 inch just order this list by the correct pipe size 2 - 2" - 4 band no hub clamps (not the fernco type at home depot..get real clamps at the plumbing supply house) 2 - 2" No hub x 2"PVC adapter 1 length of 2" PVC pipe 1 pt. PVC primer 1 pt. PVC cement 1 pkg. 6 inch sawzall blades (can be 8-10 teeth/inch, or they sell a graphite type sawzall blade just for cutting cast iron pipe). 2 - 2" PVC x 12" perforated strap hangers Make sure pipe is secure and cut out the bad section of pipe with sawzall... Here, I cut about 7/8 the way through each cut before completing either cut. Then with help I finish cutting through each end of the pipe and drop the section out and to the floor. Then you measure the distance of the pipe removed and deduct 1/2"...THIS is your overall measurement needed for the replacement pipe. Here, you will prime/cement the no hub adapters to each pipe end so thet you end up with your overall measurement (remember you have deducted 1/2"... this allows for the no hub clamp rubber lip at each clamp). Then slide the clamps over either pipe (ceiling or PVC) and install the rubber couplings on each no hub adapter. THEN (most important part here), bend the rubbers back onto themselves so that the pipe (with rubbers on) can slip in between the pipe in ceiling. Then simply flip the rubbers onto the cast iron pipe and slide the clamps up and over the rubbers... tighten appropriately. Then hang pipes as needed (may need to hang pipe prior to cutting pipe.. so remaining pipe will not fall once cut). Then test for leaks. This should do it. If you have any more questions do not hesitate to ask away... but first do as Ballengerb1 suggested and rule out that it is not anything above the pipe that is leaking down and making it look like the cast iron pipe... He and I know that this happens quite abit! Hey, if my answer was helpful please RATE THIS ANSWER by clicking on button below... thank you! |
||||

|
||||
|
|
||||
|
||||
|
The p-trap plug is connected to the bottom of a p-trap . It is sometimes removed to clean out a p-trap from underneath... I do not install these type of p-traps unless they are accessible via open ceiling or access panel.
If you have found water dripping around your p-trap plug then you will need to let things dry a bit and then get up and into the p-trap area with a flashlight and some toilet paper... Then have a friend run water and you take toilet paper and put it UP near the drain pan where the pan meets the pipe going into the trap. If toilet paper gets wet, then problem is at the shower pan or the shower drain assembly itself. If that does not wet the rag then the problem could be the p-trap itself... again, use a dry piece of toilet paper if necessary and check to see if it gets wet... finally, if this does not produce wet toilet paper, then leak should be obvious at the p-trap plug itself. Sometimes can just loosen these... sometimes cannot! Let us know what you find. Also, if you are going to attempt to replace the p-trap you will need to add p-trap to list above AND you will need to be gentle cutting the vertical cast iron pipe to avoid disturbing the shower drain/pipe seal. |
||||
|
||||
|
I don't think that it is my shower pan, I haven't used my shower in that bathroom for 2 days and put a bucket under the removed ceiling tile area. I have however used the sink in the same bathroom and after using it for 5 minutes I checked the bucket and there was some water. I am assuming that the drainage pipe that is connected to my shower and sink has a leak? This is just an informed guess, but that is why I think the pipe needs replacing with PVC. When I first bought my home I had to have a section of the other shower replaced because the same situation occurred. Once again I truly appreciate all the help and suggestions. Anymore input will be much appreciated.
|
||||
|
||||
|
Actually, he just wants to replace it. You said... Make sure pipe is secure and cut out the bad section of pipe with sawzall... Here, I cut about 7/8 the way through each cut before completing either cut. Then with help I finish cutting through each end of the pipe and drop the section out and to the floor.
The way to do this is to strap the section you are removing and cut it out, then, as 2 people are holding the pipe, cut or release the support holding this disconnected pipe and gently lower and remove. It will never hit the floor and spillage and splash is greatly reduced. My point was that you let a drain pipe 'fall' inside the home, and better yet, it is a heavy cast iron pipe. It will take a while to get the smell out of the walls and hopefully will not damage the floor. |
||||
|
||||
|
Oh doug... BOO! I am only trying to help.. you are not trying to help when you approach things in this way... IF YOU WANTED TO ADD TO THE THREAD... ALL YOU HAD TO DO WAS DO SO. With all do respect to your previous posts and time on this site... You are not adding to this as much as you are distracting. I made good points.. you added... no reason to be quoting and all silly about it. I disagree with you.
|
||||

|
||||
|
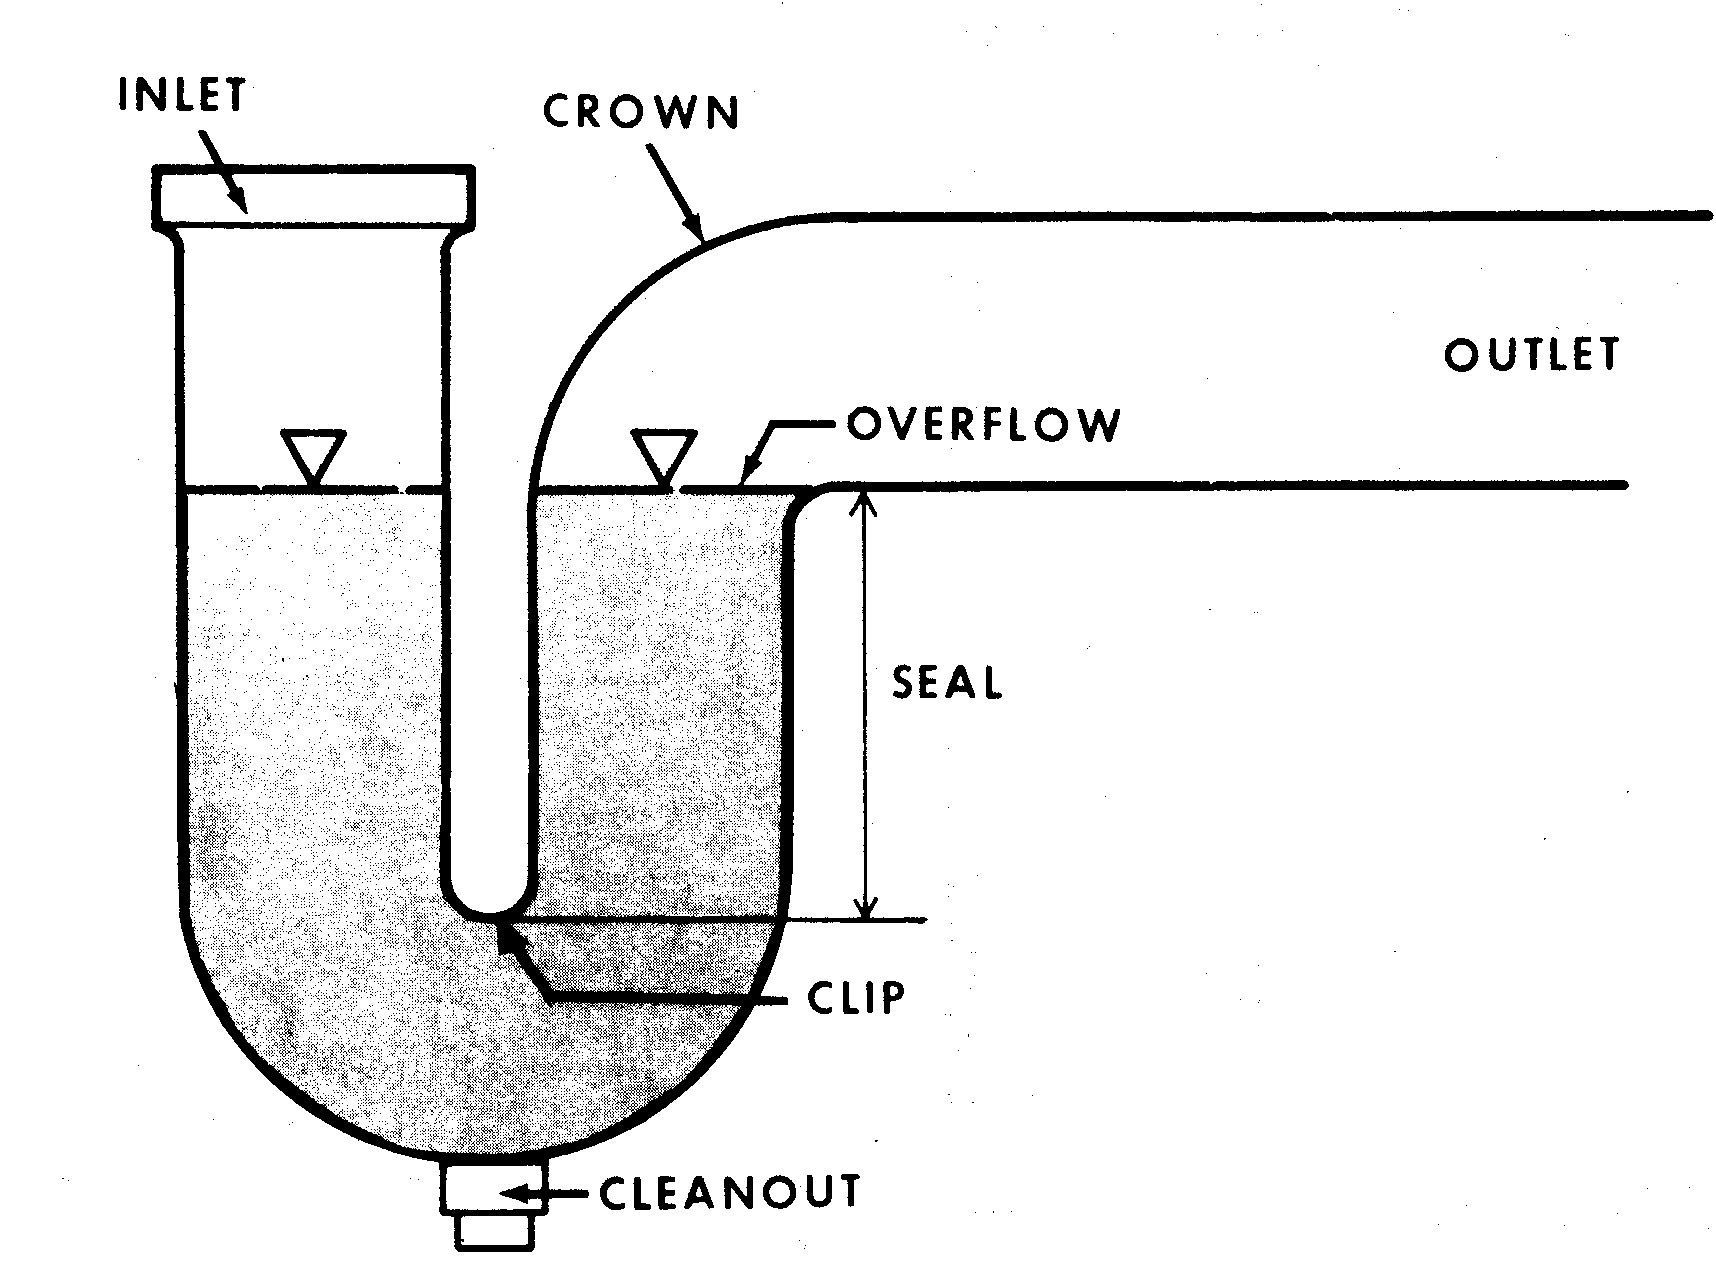
In the engineering profession the dimensions between that bend is called the clip. The diagram is illustrated by the CDC Department of Health and Human Services (Center for Disease Control & Prevention) here is the link if you want to argue with them, lol
National Center for Environmental Health: Healthy Housing Reference Manual - Chapter 9: Plumbing | CDC |
||||
|
||||
|
I think Doug is looking at this portion of your post. "Make sure pipe is secure and cut out the bad section of pipe with sawzall...Here, I cut about 7/8 the way through each cut before completing either cut. Then with help I finish cutting through each end of the pipe and drop the section out and to the floor." Not a big deal in my book but it did catch my eye too.
|
||||
|
||||
|
Yeah... not a big deal in my eyes either Ballengerb1... I mean.. did you see the length of my answer? I gave so much information that... well... where am I supposed to stop?
AFTER THAT I HOPED OTHERS WOULD CHIME IN AND ADD TO THE THREAD IN A CONSTRUCTIVE WAY. I do not think singling out a sentence is near as constructive as simply pointing out that the poster should be careful because pipe is heavy and could get messy. I mean... check that sentence again... I said "then with help I finish cutting the end of the pipe and drop the section to the floor." Should I have said gently lower.. Maybe? Should I have added that it could be messy.. Maybe? I just wanted to present a quick breakdown of the job... not a book! You know I love you guys... and am still trying to figure the site out... just feel that since we all have same goal in mind that we should act more as a team... not so much as individuals. Anyway... hoping doug does not feel this is directed at him... I hoped this was all dropped and forgotten about. |
||||
| Question Tools | Search this Question |


Add your answer here.
Check out some similar questions!
I have a walk in, ceramic, shower in the upstairs master bath. It is leaking into the downstairs ceiling (living room). We have removed pieces of the ceiling under the shower to see what the issue may be. It has a constant drip that speeds up when the shower is being used but never stops. It fills...
I have a hot water leak in a copper pipe about 5 inches slab is 12inches does anyone know any easy way to fix?
My house was built by a bunch of @#$%&, so I'm always running into things that make no sense. Now I've come across something that I have no experience with and it has me a bit stumped. I removed my existing shower base. I had to cut around the drain since I was not sure how that attached to the...
I live in an upstairs condo. My downstairs (condo) neighbor just showed me holes he has had to drill in his ceiling. He's had to drain off water that has seeped through from my tub plumbing upstairs. Many of the upstairs condo's in our complex have had to face this problem. The complex was...
In a fiberglass corner shower shell. What I have is an old leaking rusted Shower valve assembly. It leaks from the Shower head that is a hand sprayer with a wall mount from the sprayer. It also leaks around the both the hot and cold water wall mount knobs. The cold water knob the sleeve that...
View more questions Search

|
