| |
|
| Browse | Ask | Answer | Search | Join/Login |
|
|
||||
|
yup...
You want to purchase a length of 4" (ouch), 1- 4"x3" pvc wye and then if available 2-4" no-hub x 4"pvc adapters. Then cut 2-3" pieces of 4" pipe and prime them and fitting and then cement these into the wye. Then cement the no-hub x pvc adapters onto pipe ends. Then you put on top of pipe and make marks PLUS 3/4" and then make straight cuts through pipe... etc... If no-hub x pvc adapters are not available we can discuss alternative. They are usually available at home depot! This is not that soil pipe adapter you showed me earlier... this has a rib at one end... see picture below |
||||


|
||||
|
Everything is going good mark,, just want to write a couple of questions before I forget, haha
OK so not quite sure how this works... but... with the ele I put bellow the floor it brings the plumbing right up to concrete level,, isn't my flange going to bring up the toilet another 2" or so?? or do they have street flanges? also i just noticed the 2" pipe from the wye to the wall, I just noticed you had it in the wall... one problem, the wall is already there, I'm wondering,, can I just bring up underneath the vanity then use a 45 or 22.5 above a SAN T to curve this into the wall and then keep going? I didn't build this wall it was an existing wall, Let me know... Thanks |
||||
|
||||
|
hey mark,
hope your still there, OK so I have the pipes all laied out and I'm waiting for approval. :D too many pictures to post in here but I have them all up at this link, couple of things... how do I know when I have a 1/4" slope? I've just been using a level ontop of the pipe... also the ele for the vanity and vent,, it is sticking out of the cement inorder to keep the proper slope. not quite sure how to do the p trap, do I have it correctly,, the pipe will not come up straight because its not straight its angled back towards the drain direction,, its in the correct location according to the instructions of the shower 1ft X 1ft center of pipe anything else you see... let me know |
||||
|
||||
|
Hey Brian... I'm here!
Looks like you did a great job! Really.. a great job here! Be sure to remove those rocks up against the pipe... backfill with good soil (rocks are bad)... cement as needed. You need to wrap some cardboard strips around the toilet pipe you stub up so can install the closet flange later. Cardboard around pipe should be about 5" diameter hole...ok?? You will remove the cardboard after concrete has dried...then you will cut pipe and install flange OVER TILE floor (if tiling). You know you have 1/4" pitch per foot when you take a 1/2" shim under a 2 ft. level and level reads level...that make sense?? If using a 9" torpedo level would use a 3/16" shim and again should read level when laid down on pipe. You don't need to worry about that though... ALL LOOKS GREAT!! Just need to stub up pipes and perform water test... will discuss tomorrow. Looks really good! |
||||
|
||||
|
Hey Brian...
Again, all looks great! First, I want you to cap a piece of 3" pipe that is six inches long and then cap it with a jim cap. Then I want you to dry fit this into the toilet elbow. You need to dry fit (just place into toilet hub) this because you will be pulling it out later and using a STREET closet flange after tile is installed to install the toilet. Wrap cardboard around the hub and the pipe so that concrete won't touch it when patching floor. Second, cement 15" pipes into the shower ptrap and the sink drain and then cap them with jim caps. Third, you want to build a box out of 2"x4" so that box is about 8"x8"... build it with only 1 nail in each end as this will be installed around the shower pipe so that it is about an inch above the concrete floor and then you will install the concrete floor and then you will pull the 2"x4" box out later so that you can install the shower strainer assembly for your new GRAVITY FLOW shower... ;) Fourth, I would now have you remove the caps and flood this system with water from a hose... cold water only. Also fill the tub upstairs and drain that to assist in testing the main wye fitting/connection. Test each pipe with hose at full run for 5 minutes each and then inspect each joint. That will have to do as a test here! Fifth, cap the drain lines again and then backfill this baby to within 3 inches of the concrete floor Sixth, wet the dirt pretty good and the edges of the old floor, then mix/pour concrete and use a WOOD FLOAT (trowel) to work the cement into the old concrete floor edges. Then use a wetted straight piece of 1"x4" pine (I dunk mine in 5 gallon bucket of water when doing this alone) and screed over the trench to bring concrete level with old floor. Finally, use a metal trowel to smooth out the finish of the concrete and then let it dry. A metal trowel will pull water to the surface of the floor so don't overdue this part...just smooth and be done. Mix the concrete in a wheelbarrow if you have one. I am thinking you will need about 7-8 80lb bags of concrete. After all done, post another pic. So we can see this put to bed and we can all know that you have completed this underground job AND you don't need to cut the shower walls or step up 8 inches into bathroom or listen to pumps whirring at midnight or have to replace pumps ever, etc... :) Glad you opted for this!! Let me know what you think or if have more questions! MARK . |
||||
|
||||
|
Sounds great Mark, thanks for the list 2 questions right now? Do I pack the dirt good? And is my p trap correct, by not being straight (its tilted back with the drain pipe. Oh and my ele's for the sink are coming out of the ground.. Thanks |
||||
|
||||
|
Pack the dirt good... especially under the pipe but do so in a manner that does not raise the pipe higher.
Can add larger concrete pieces in the trench after you have covered the pipes real good with dirt (no rocks /concrete pieces go near the pipe). Shower Ptrap is not good...sorry! This pipe needs to come out of ground plumb both directions. To do this you need to level the last piece of pipe going to ptrap and then level the ptrap in other direction... this is critical later as is the placement. Spend extra time getting this dead on nuts so that when you go to install the shower base it is easy! The fitting at lavatory is fine... lots of fittings end up in concrete... just try not to let pipe up in concrete or cover with less concrete here... ok? Your idea with coming up inside vanity will work just fine. You will install the vanity and then later you will add that dandy cleanout I mentioned and then the 2"x1.5" sanitary tee and then 90 into wall (which will have pipe stubbed out from 2" vent to attach to). Keep me posted... MARK |
||||
|
||||
|
JUST IN!!
READ ALL ABOUT IT!! Haha, wow after a long day of working getting 600+ lbs of concrete ITS DONE, and I think it looks great,, went mostly with no problems (knock on wood) I've been done for a few hours now, just got back to my house So I've updated that link I posted, Here's a quick view :) Before 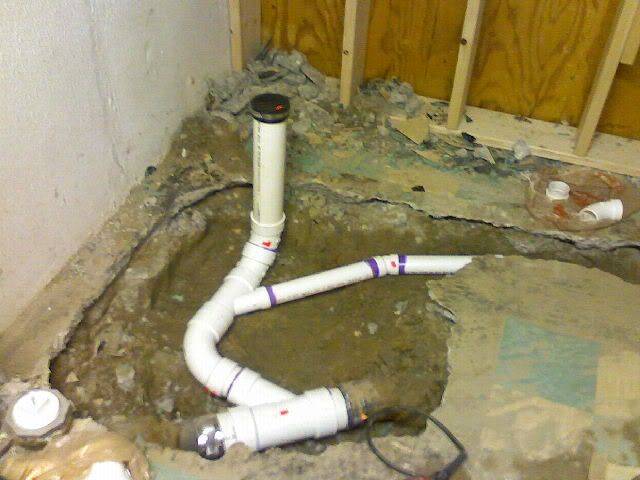 After :) 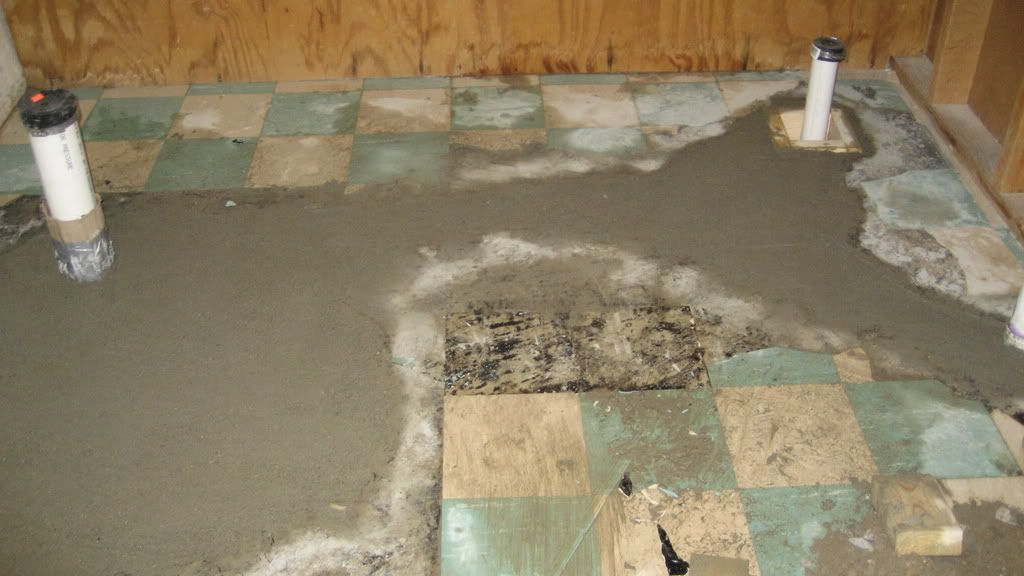 Better and more pictures here So you were saying earlier about water supply lines, I my have done this half backwards, but I already ran lines for shower and vanity a week or so ago... I knew how to do copper supply lines, hopefully its OK,, as you were saying copper is too expensive, wish I would have known,, good thing I know for the longest line ( the toilet) I will take pictures,, you can kind of see them in some of those pictures I already have,, the vanity ones are going to be moved,, those were where I thought things were going to end up... but I've had to make some adjustments, as a new door has been requested... lol Talk more in the AM,, I'm dead tired Night |
||||
|
||||
|
Brian..
Fantastic job you did there... Mom should be very proud of you! I bet you are glad that's over... :) Now I can drop- by and take a shower and I won't bump my head or have to bend down to get my chest wet!! Next will be to get that 2"x4" box pulled up and out and get that cardboard from around the toilet pulled, too. You did dry fit that stub up for toilet like I stated (twice)... yes? Next will be to finish piping the water... if you started copper and only need to finish the shower valve itself and pipe up the toilet you stick with the copper tubing you've been using. At least you'll know about the PEX systems I talked about earlier for next bathroom :p PEX requires special tools and just not worth learning just to run 1 cold water line to toilet. Toilet water usually roughs in at 6 inches to left of toilet pipe center and about 6 inches off finish floor... but can go as high as 8 inches off the floor for standard two-piece toilet. Finally, you will want to purchase a NO-CALK shower drain assembly (see picture below)... this will be installed as expected (use clear silicone under lip of drain) and then the shower base with the drain assembly in place will be lowered over the shower drain pipe and the base will be leveled from front to back and from side to side and then screwed into the wall via the flanged edges of base. The shower base should be set in a bed of mortar or structolite as I discussed with you earlier. Then you will slip the rubber donut over the pipe (see enlarged pic. Of donut) by soaping up the inside of the donut a bit. Then install the metal ring about hand tight (will compress the donut later when tightened)... mark the pipe at the height of top of ring... and then remove the ring and cut the pipe down to about 1/4" below that mark using an inside pipe cutter tool in a drill (see last picture). Practice with this tool by cutting a piece or two of pipe out of place. Then you will replace the metal ring and you will tighten it with the flat wrench with slot in it that is provided with the unit (tie a string onto this wrench as it has a tendency to fall into the pipe if dropped). Then click the shower strainer in place and you should be finished with the base. If base rises a little off the floor to plumb it up it will be fine as long as no higher then 1/2" or so (tile will hide later). You should purchase a drop ear elbow for the shower arm/shower head... see third picture. And if your shower valve requires male adapters (see fourth picture) then you want to be sure to PRE-SOLDER these to copper tubing before putting teflon or pipe dope on them and installing them into shower valve. That should be enough to keep you going for a few... ;) MARK |
||||
|
||||
|
Not just Mom, me too ahah,, man I think I spent more work trying to do it the other way,, what a waste,, whish I would have done it right the first time,, no other way but the right way to do things, it did indeed feel good to finally be done with the drains in this...
... well I will problay need another 25 to 30 ft of copper to run the toilet,, plus id like to learn, so it would be financaily worth it... haha Are the tools expensive? Its always good to have tools :: I have the drain already also,, well it came with the shower... here's a link that has instlation instructions and spec sheet. Also,, I have all the supply lines hooked up and pressurized... shower too, the only thing is that I have the wrong drop ear ele... the one that I have doesn't have ancors
You should purchase a drop ear elbow for the shower arm/shower head... see third picture. And if your shower valve requires male adapters (see fourth picture) then you want to be sure to PRE-SOLDER these to copper tubing before putting teflon or pipe dope on them and installing them into shower valve.
Thanks mark for helping me with that floor, don't spend too much time on here today enjoy your labor day with your family :)... tomorrow morning I will call the plumbin store and ask about the PEX they carry Talk to you then P.S. Your welcome to come over any time... haha |
||||
|
||||
|
I swear... always takes more time to screw around then to do it right!
Your shower unit came with a no-calk drain so all set there... ;) Cool! You don't need to have drop ears on shower elbow if threaded fitting in place already... just anchor well with copper clips and will be fine. Common height for shower arm is between 78 and 80"...then the arm is installed with ehad lowering to comfortable height for most. In your case, opt for 78" (cause you guys aren't too tall) and will enjoy that for your family. Shower valve itself can be anywhere you want it. Check what type of PEX in your area... and most plumbing supply houses actually rent the tools so don't necessarily need to purchase tools... ;) Click on this link to learn more about PEX systems: AOL Image Search results for "viega pex plumbing tools" I use the viega pex system (not shown at above link), but not sold everywhere so determine what's in your area and we can chat about that anytime. Have a good day, Brian! MARK |
||||
|
||||
|
Couple of questions...
How long do you usually let your floors cure for?. Small difference in my thought... the toilet elbow is not even with floor in fact its about an inch and half down :/ I am suspecting you thought of this when you told me to use the cardboard so that there is room for a regular flange? Or does the street flange have some length to it? I hope that I don't have a problem here And I still have venting to do right? Thanks Just wanted to write these down before I forgot them |
||||
|
||||
|
I usually finish the plumbing and the electric work.. then I blueboard and plaster then I set my tile... so cure time never really works into things for me. If yopu want to tile sooner than that I would say to let the concrete dry for a couple days and you should be all set to tile.
A street closet flange does have some depth to it (about 2.5" deep from under ring of closet flange to make up on the fitting)... so I think you'll be all set once you set the tile. You may need to order an extra deep street flange.. ;) Try a regular street flange and see what happens.. let me know. And yes... you still have to connect that 2" vent from the lavatory into a vent in the attic...if I remember your setup. Look around basement and just make sure there is no vent to connect into...I'm quite sure there won't be after seeing that utility sink setup...;) Then look around for a way to get 2" into attic (I run them up inside closets once inawhile.. justify left or right and really will never see it)... and connect into a 2" vent or larger up there. Keep em' coming Brian... looking forward to you finishing this one and taking a shower in that baby! PS...you are installing a bathroom fan in this bathroom...yes?? Let me know?? And, who's doing the electrical?? Let me know... MARK |
||||
|
||||
|
Hey mark,
Yes yes,, of course I'm putting in a fan, I am going to do the electrical, I've done elcetrical many times before and also I'm in school for electrical, not residentail work but I know how it all works and the proper precautions to take,, as well as the required equipment :) Ceiling- I'm doing a drywall/ and pannel tile board over the shower,, and then vinyl drop ceiling for the rest (I got some high humidity clima plus tiles from usg... garenteed for 30yrs... ) because there is a lot of acces to pipes right above this area... walls I'm doing same drywall and then a tile pannel board. Man,, the attic is going to be hard to get to... we have 2 floors to go through and all finished walls, this bathroom is sitting underneath the kitchen |
||||
|
||||
|
If possible may be able to run the vent to the upstairs bathroom.. cut a hole in the wall and install a vent there. There will definitely be a 2" vent at the 1st floor bathroom...would need to connect in at about 48" off the floor... just another thought for you.
Otherwise all sounds good. If need electrical advise on this let me know... been wiring them for over 20 years now. MARK |
||||
|
||||
|
Wow... you do it all... OK if I have problems I will let you know lol
On venting... I'm pretty sure the upstairs vent is running through the wall... right at where another wall connects... so at the T... what kind of bends can we do for the venting? I could get it to a closet I think and then up and through to a vent in the atic... not sure though... I will look around Oh and I think its iron in the walls,, up to the attic Brian |
||||
| Question Tools | Search this Question |


Add your answer here.
Check out some similar questions!
I have water coming into my basment through the walls. Mainly where the wall meets the floor. How can I take care of this problem.
Hi... Just bought a house and the basement is not level. What can be done to create a level floor ready for carpeting. How much with labour and material would it cost?
I have a old house with a stone foundation, what's the best way to seal a stone foundation, we are getting leaks from a couple areas. Thank you Rob
Hello I have a couple of questions, first off I am building a bathroom in my basement. It is a new house only 2 years old there are two stubs in the basement. One is the small one which I am guessing is the toilet the other a large square hole filled in with rock. I am guessing this is for the tub....
I'm trying to fix a problem in my house. There is only one thermostat and it is on the main floor but heat rises! So upstairs is really hot! In the basement it's really cold! What is the best way to fix this? I am renovating the basement so I would like to fix this before I cover the ducts up. I...
View more questions Search

|
