| |
|
| Browse | Ask | Answer | Search | Join/Login |
|
|
||||
|
But, the reason I can get this to all gravity drain is because the shower base is raised already about 8" which is the max because my shower doors are 72... the way I had to connect the san t to the existing clean out has caused me to have more height that expected... I'm already going to have to raise the floor an additional 3.5 to 4 inches because of this and the mimnium drop caused by the elbow to toilet flange, unless you know of something else But as of now this is how I plan on connecting to the stack, 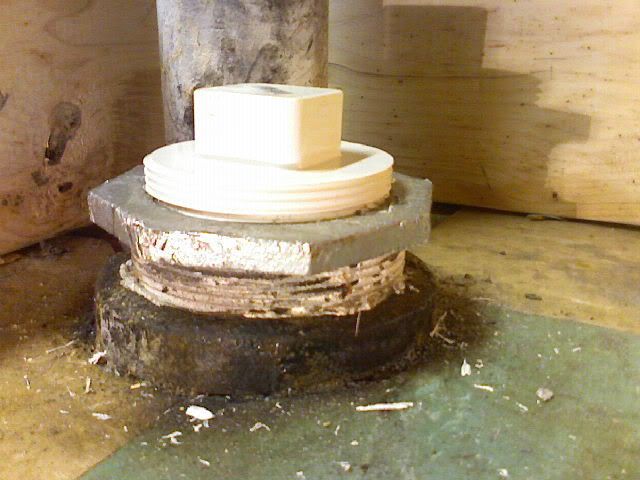 Its too high to allow me to run all of the shower piping and sink piping with a downslope of even a 1/8th inch. And I have this as tight as I can get it... Unless I can put a 45 ele at the stack run a wye then a 45 from the toilet, other side of wye I could install a T with a clean out? And then connect piping from shower and sink?? Let me know what you think of this, However no inspections so if wetventing isn't to code but will work fine lets do that... if this works what I just had... wow that was a revelation |
||||

|
||||
|
OK... I've done it
Pictures are ready... atfirst I found this on the right and started freaking out, but soon took off the clean out cap and realized this wasn't the path I could see... 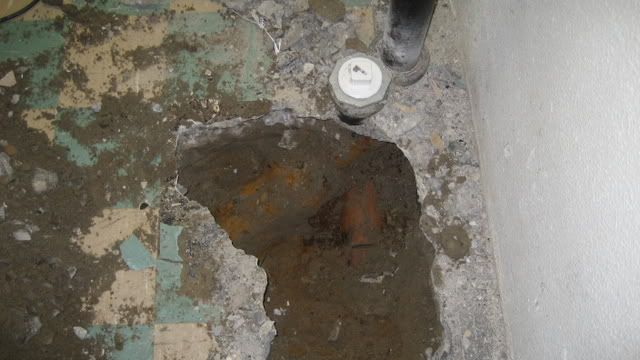 Is that an old clay pipe?? Didn't think the house was that old and the basement seams to have a consistent cement... anyway Here is a eye level of the pipes... if this continues on this path... it will intersect closly with the shower drain and sink. 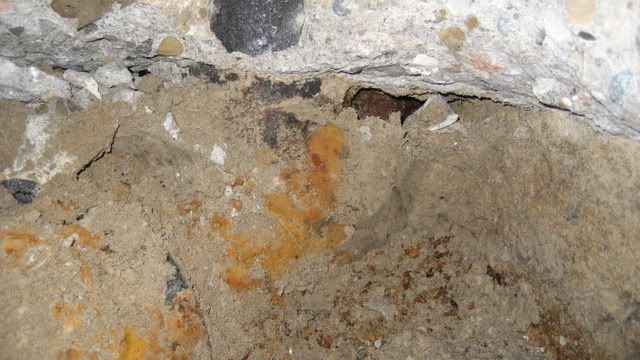 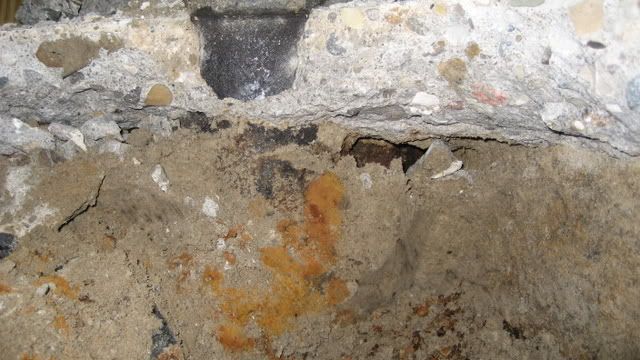 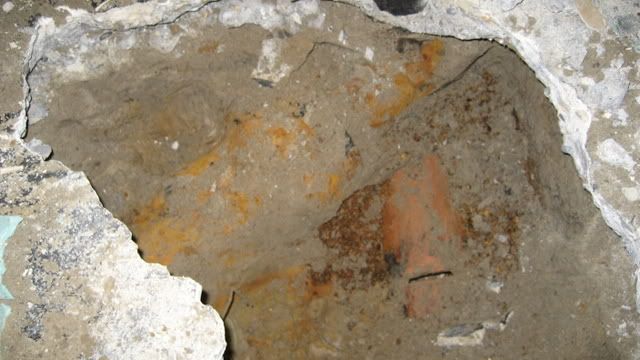 If you need to see more let me know I want the toilet to be in this area... to the right of the overall view picture... but within the hole I opened up so far. |
||||
|
||||
|
Hi Brian... excellent job! I see you don't mess around!
The clay pipe is an inside perimeter drain pipe so try not to disturb this too much.. ok (I would have you cover the clay pipe with some gravel and then a liner fabric before closing up the hole... can discuss later). I'll draw up the best way to pipe this up a little later tonight. I am going to present the piping in the wet vent manner discussed earlier. You really lucked out with the pipe headed as it is... and not too deep. Seems you have a little luck on your side.. ;) See if you can locate some lennox diamond sawzall blades at your area home depot or similar. If they don't have diamond blades then the carbide blades do OK, too. Ideally a local plumbing supply house will be open tomorrow morning and you can go purchase the correct fittings and clamps. If not, then we can come up with another solution... best overall will be to get a cast iron no-hub wye fitting and some no hub or mission style clamps. Check local supplier in the AM and I'll give you a list for them if they are open. If not, then I'll give you another list to go to home depot and get supplies there... I am thinking you can finish this up this weekend and get working above ground next week! PS: That looks like it is 4" cast iron underground...a good thing!! Just so you know! Talk soon... MARK |
||||

|
||||
|
soundss great mark... I know that the one main plumbing supply in my area is closed sat and Monday because of labor day, but of course home depot is open, however there could be another local plumbing supply open, not sure though there is a local hardware store it's a True Value, but this place is huge and has been here forever, they cary everything, alota people say if you can't find it anywhere check northside, and usulay they do have it. This place will be open, haha, and no I never mess around, I'm the kind of guy that will work his off until its done then take a break and if I'm talking about it I will problay want to do within ten min, don't like to mess around,, as you can see, sometimes this works sometimes it gets me into a mess, haha question, since I see that your still here, if this runs in the directon of the shower drain should I just do two sepret cuts? Or should we stay with one? oh and the perimnter drain... it had a small amount of gravel, but some dirt fell down in that crack? Is that OK? Should I be concerned? this is the stack above my floor and underneath the first floor. 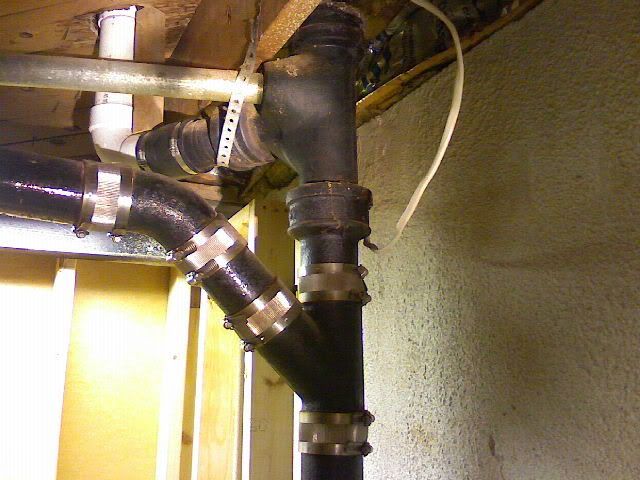 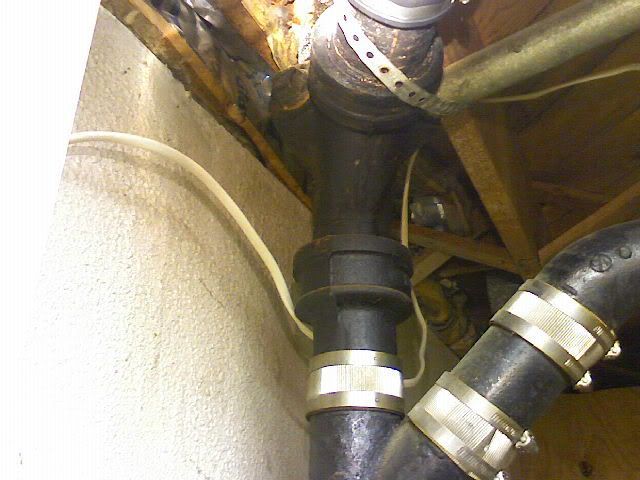 the cast iron wye goes to second floor full bathroom, the galvanized steel pipe is from first floor shower/bath and then the pvc is from the first floor toilet if possible could we use the open 2inch fitting for the venting? Only things above this is the firstfloor sinks, there are two small ones thanks -Brian |
||||
|
||||
|
Hi Brian...
No issue with a little dirt getting into the clay pipe... happens at every joint between clay sections. Just be sure to cover with 3/4" to 1" gravel stone. Sorry... that 2" tapping is a waste line tapping and will not be anything close to a vent for this bathroom. I bet if you chase out the other 2" tapping with galvanized piping that it picks up the lavatory or tub..? Let me know. As presented... YOU WON'T LIKE THIS... but we will need to get a little creative with the venting to this bathroom, but we discussed fact that venting was going to be tough underground or above the floor so that really is not a change as much as a fact. I mentioned connecting in at least 6 inches above the sink in the bathroom... either you need to connect into the stack a foot or so above the sink on 1st floor or you will need to run vent into the attic and connect vent from this bathroom up there (or could go with accessible PRO-VENT.. but since going this route I suggest you go full tilt and finish accorrding to code and tie 2" vent into vent system as described! ). We will discuss more. Anyway.. I will draw up some basics... be right back... (refresh screen every 5 minutes until you see next post). MARK |
||||
|
||||
|
Haha, OK on standby refreshing every 5 min, don't rush though I'm in my own world... however, I did label all of those connections in my post. The galv pipe goes to the tub on first floor yes
For venting... kind of worried about this... don't have any access to the vent stack between here and the attic, even in the attic I was looking its really cramped not much space at all... what about, I've read about air valve... I forget what its called, the alztimers is kicking in again |
||||
|
||||
|
Hi Brian... get that floor opened a bit more and dig down so the dirt is under pipe.
I will post all info needed from here by 8:00am eastern time... check back then. I am having fun with this and think you are doing a great job. Talk in AM... my little guy wants to play! MARK |
||||
|
||||
|
Haha OK, No Files are looking good, keep in mind... I'm no longer at the job, so I can not take any additional pictures tonight, I may have some saved in email I can look if you need others. ? Question? ->am I using iron for anthing other than the wye? |
||||
|
||||
|
OK...
You will need to purchase: 1-4"x3" no-hub cast iron wye fitting 2-4" 4-band clamps (best here..see 1st pic.) or can purchase shielded clamp (2nd pic.), but don't buy fernco rubber clamps (third pic.). 1-3" shielded clamp that transitions from cast iron to pvc plastic pipe (will say so on the clamp) PVC cement Pvc primer 2-3" 45 degree fitting 2-3" street 45 degree fitting 1-3" pvc 90 degree fitting 10 feet 3" pvc pipe 1-3"x2" pvc wye 1-2" pvc wye 2-2" pvc couplings 1-2" pvc ptrap without cleanout 3-2" pvc 45 degree fittings 3-2" pvc street 45 1-2" dandy cleanout (also called a test tee... see fitting picture) 2-2" pvc 22.5 degree fittings 2-2" pvc street 22.5 degree fittings 1-2"x1.5" sanitary tee fitting (will be installed above ground to pick up sink) 10 feet 1.5" pvc pipe 3-1.5" pvc couplings 1-1.5" pvc 90 degree elbow 2-2" rubber jim caps (see last pic... cap pipes after they come out of ground) 1 can rectorseal pipe dope (for lots of things as we go along). 1-3" jim cap (toilet) 20 feet 2" pvc pipe That should get you started. If can't find the 4x3 no-hub cast iron wye then will need to purchase a 4"x3"PVC wye, a 10 foot piece of 4" pipe and 2-4" no-hub x 4"pvc adapters....ok?? You will still use the original clamps. I have included a few extra fittings...JUST IN CASE! You may want to purchase other fittings as well... they can be returned. Some basics here: All pipes pitch at 1/4" pitch per foot. Toilet pipe gets roughed in so it is 11.5" to 12" to center of pipe from rear finished wall. Sink gets piped so it centered on sink. Sink pipe ends up at 18" to center off the finished floor... so if traveling 4 feet from the vertical 2" pipe you must start the 2" pipe you must start the 2" sanitary tee at 17" to center from finish floor so ends up at 18" off finish floor in the end. Shower p-trap placement cannot be finalized until you have the shower base in home... so for now can stub to shower area and cap for now and then get the shower, determine correct rough in and then will place the shower p-trap. We can discuss testing all this once you get all this piped and capped. For now, stub the 2" sanitary tee at 17" and cap (after cementing over floor you will add the 2" dandy cleanout here and then the 2" pipe out of ground about 20" sanitary tee for the sink). Obviously, after the wall is built by the sink you can drill through the studs and install the sink waste. No regular 90s underground... only long sweep 90s... can make using 45 and street 45 fittings as I discussed with you earlier. Let me know if you have questions. You know my number... ;) MARK |
||||
|
||||
|
Hey mark... Thanks for all this, One question? When I attach the iron wye, do I make the part that comes off sloped a little bit?( if you were to put a level on the piece perpendicular it would not be level across it, so the part leading to the toilet is sloped into the drain pipe slightly?) |
||||
|
||||
|
Hi..
Yes you want to install so has pitch up. When get set to cut into the cast iron you would lay the fitting on top of the pipe and then cut the pipe so it is about 3/4" longer than the fitting....this is very important..ok?? This 3/4" excess will allow for the clamps inner rib. You will install the clamps, slide clamps back, then bend the rubber parts back upon themselves, then install fitting, then flip rubbers back to grab the fitting.. then slide clamps in place and clamp this up to a proper torque. Keep me posted |
||||
| Question Tools | Search this Question |


Add your answer here.
Check out some similar questions!
I have water coming into my basment through the walls. Mainly where the wall meets the floor. How can I take care of this problem.
Hi... Just bought a house and the basement is not level. What can be done to create a level floor ready for carpeting. How much with labour and material would it cost?
I have a old house with a stone foundation, what's the best way to seal a stone foundation, we are getting leaks from a couple areas. Thank you Rob
Hello I have a couple of questions, first off I am building a bathroom in my basement. It is a new house only 2 years old there are two stubs in the basement. One is the small one which I am guessing is the toilet the other a large square hole filled in with rock. I am guessing this is for the tub....
I'm trying to fix a problem in my house. There is only one thermostat and it is on the main floor but heat rises! So upstairs is really hot! In the basement it's really cold! What is the best way to fix this? I am renovating the basement so I would like to fix this before I cover the ducts up. I...
View more questions Search

|
