| |
|
| Browse | Ask | Answer | Search | Join/Login |
|
|
||||
|
WC Flange & Rough In Inspection
Location: Central Virginia
Project: Basement finishing Job will be inspected I'm just about finished with my basement plumbing rough in. I have one question: is it typically required to have the WC flange in place for this inspection? I am still working out some details about what type of floor I will have in the bathroom, and I don't what to create a problem with the flange at the wrong height. Expert advice please!! |
||||
|
||||
|
On the rough in inspection all the inspector's looking for is the proper drain and venting installation and whether the job will hold water overnight. A toilet flange's not necessary for this in spection. As a rule we install the flange on the second phase, tub set and water pipe. Good luck on your inspection. Tom
|
||||


|
||||
|
Mark: Thanks for chiming in again; I guess I have more than one question ;). What would you recommend for the test (and how should I prepare)? I still have a few details to work out but I hope to schedule an inspection late next week or early the following. Can you give me a heads up on what I can expect from the inspector? |
||||
|
||||
|
Hey hey...
A plumbing inspector usually expects to walk on-site and find the system tested to a 10' head of pressure... This can be done by isolating the rough in with caps, etc. and then pumping the system up with air (NOT COMMON) or capping/isolating the pipes in such a way that you can fill the roughed-in pipes with water to a reasonable level to test them for leaks. This usually requires some caps, plugs, etc... I would call your local plumbing inspector and simply ask him how he wants you to test this rough-in. May be that he requires a 10' head of pressure (pop back here)... may be that he wants to inspect and then decide... hard to say. All the inspectors I know would rather you call now and discuss this then wait until they show up for inspection... ;) Let me know what you think... MARK |
||||
|
||||

How are the new drain lines I have installed tested
|
||||
|
||||
|
If you are concerned about the possibility of leaks in the new water piping, then cap it off and air test it to 60lbs before you tie it in. As for the waste piping, I would definitely recommend a 10ft head of water over an air test -- Plastic piping can burst and shard if too much air is introduced into the piping, particularly if it's foam core PVC. Washington State banned air tests on plastic DWV several years ago after an inspector had a near miss from flying shards of debris. |
||||

|
||||
|
Hi guys:
You can use test caps (see image), jim caps (see 2nd image) and test balls as posted by Tom for plugging up the drains above the ground. If there is an existing washing machine or an existing sink in the basement these will need to be disconnected and capped as well. To cap off or isolate the underground pipe so you can test the pipes with water will depend on the type of pipes in place and how much of the piping is exposed. Here, there should be a CLEANOUT associated with the old underground piping. Is it exposed so you can see it? Is it on a wye fitting or a T shaped fitting? Is it cast iron or PVC (plastic)? Otherwise, you may need to cut into the 3" drain from the bathroom branch and install a jim cap with drain (see image). This will allow you to fill the system and then attach a hose to drain the pipes after the test... then you can re-connect the pipes using a shielded clamp (see last image). Let us know more... MARK |
||||
|
||||
|
|
||||
|
||||
|
Funny... EXACTLY how I do them myself! When I finally discovered these... made testing go so much smoother. I don't, however, use them for underground plumbing... I use a long test ball at the main drain cleanout and I was waiting on answers from 435 before going into that detail... but glad to discuss more if he wants.
I am also confident that 435studio didn't know about these so at this point I'm figuring he will need to disconnect the pipe no matter what and at that point can just re-join the pipes using the clamp I posted. Of course, that means that if the bathroom branch clogs he will be snaking the drain line down the toilet pipe itself. However, if you want to install this test tee 435 (see picture) it is cool, but be clear that you will also need to install a cleanout access cover plate in the finished floor to access that cleanout in the future... ;) Here, you will install the test ball into the test tee, pump it up, fill pipes, stand for test and then deflate the test ball, let pipes drain and then pull the ball and replace with the test tee plug. These are only available at a local plumbing supply house. Let me know if you need more info...  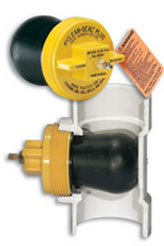 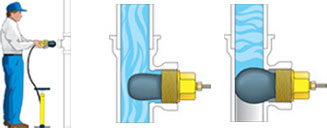 MARK |
||||
|
||||
|
I really appreciate all the assistance! I don't mean to be dense about this but I'm not quite sure I get it yet... The only clean-out I know of in my current system is located outside. I'm still not clear on how I can test only the new drain lines, without including some of the existing drain lines as well. Maybe that's the way it has to be. BTW, what is a 10' head of pressure and how is it created?? At this point my supply lines are already connected, no leaks :) I am using a 2" stub out for my vanity drain which also serves as a wet vent. (I'm being forced to use an AAV because of the inaccessibility of a vent above) I have run a 2" drain line for a bar sink (also vented with an AAV) that connects to the existing 3" vertical drain from above. I have already tied that in using a procedure Mark detailed in another post. (It worked like a charm, by the way!) Thanks for your patience and persistence!! |
||||
|
||||
|
I don't mean to be dense about this but I'm not quite sure I get it yet... The only clean-out I know of in my current system is located outside. I'm still not clear on how I can test only the new drain lines, without including some of the existing drain lines as well. Maybe that's the way it has to be. BTW, what is a 10' head of pressure and how is it created??
You ask,
I'm still not clear on how I can test only the new drain lines, without including some of the existing drain lines as well.
A "10 foot head of water" consists of filling the roof vent on the new drainjage up to the top and leaving itvthere so the inspector can see that there's no leaks This 10 foot head will keep the tested area under a little less then 4 1/2 pounds of pressure until the inspector passes your work. Good luck, Tom |
||||
|
||||
|
The Clean-Out Tee's can be installed either horizontally or vertically and then abandoned in place after the piping has been inspected. |
||||
|
||||
|
Hey 435...
If nothing else you can cut the branch line from the new bathroom and install the jim cap with drain in it so you can fill the pipes and then drain the pipes after the test without making a mess. Without the cap with drain disconnecting the test can be very messy (unless you use a test tee with test ball as noted by growler). After that you would clamp it all back up using the clamp I posted. An inspector will want to see a 10' head of pressure so you need to test somehow... ;) Back to you... |
||||

|
||||
|
OK you guys are going to think I live in Oz or something... I called the County Office and asked to speak with a plumbing inspector to ask what they wanted to see as far as my rough in inspection. Our community has "combination inspectors" which means that these individuals are able to inspect all aspects of residential construction (there are also commercial "combination inspectors") I told the individual I was almost ready for the inspection, but wanted to know specifically what type of test they wanted, and how I should prepare. I was told that my project was really a "renovation" and they knew it would be very difficult to isolate and pressure test the new drainage pipes. They "understood" that as a homeowner, I don't know everything that a professional plumber knows. Basically what they do is visually inspect the new drain lines and if they see purple primer and the joint and setup looks good (i.e. slope is correct) then it will pass. As far as supply lines, it is OK for them to already be connected to the existing water supply. As long as the lines are the right size, and the recommended radius has been used (for pex in my case), nail plates are in place and there are no visible leaks, then, you pass. Holy crap!! Is this for real? I've tried to be very diligent in this project and have everything be up to code or beyond. I'm wondering whether any mistakes I might have made will even be caught; any further advice?? |
||||
| Question Tools | Search this Question |


Add your answer here.
Check out some similar questions!
Hi, Doing an extensive DYI rehab on a single family home in NJ. The short question is does this look like it will meet code? The Galvanized Pipe and the cast iron stack it is attached to will be removed when I get this hooked up. My concerns are: I did not put a vent up on the tub on the right...
We have a cast iron flange and the bolt holes are not useable can we cut off the top and add a new plastic flange
After I find the soil pipe, which will likely be cast, can I knock a hole in it and use a saddle, and cover it all with concrete?
Got a real newbie question. I'm in the final stages of finishing my basement and am turning my attention to the bathroom. Our house is about 6 years old and we had the builder rough-in a 1/2 bath for us (so venting and stub are already present). I have the closet flange just about ready to go...
What all is involved in mounting a toilet flange to rough in on conrete? Thanks in advance!
View more questions Search

|
